


Building a Swagger UI for your API in AWS API Gateway

This article describes how we built a reusable solution for deploying a Swagger UI for any API with a Swagger specification. It can be used to provide interactive documentation of your APIs to your customers, irrespective of whether the API is deployed in AWS API Gateway or outside of AWS. As long as you have the URL of the API’s Swagger specification JSON/YAML, this solution can be used.
Note: If you’re just looking to use this solution to document your API, it’s available publicly in the AWS Serverless App Repo here. Simply deploy it to your AWS account, provide the URL to your Swagger spec & you’ll have a Swagger UI ready to go in just a few minutes. You can even combine the base URL of your existing API with this solution to have the documentation of your endpoints right alongside them at https://api.your-domain.com/api-docs/. This is explained in detail at the end of this article.
What is Swagger?
The Swagger API project started out a decade ago with a goal to automate many common API-related activities like generating API documentation & client SDKs. It soon evolved to include an interactive user interface where API consumers could “try out” the API.
The Swagger API specification language went on to become the OpenAPI specification & is now the de-facto industry standard for designing RESTful APIs. petstore.swagger.io is a sample Swagger UI that demonstrates many of its features like support for authentication & input validation.
Why Swagger?
If your primary use case is to provide interactive documentation for APIs deployed in AWS API Gateway, there are other solutions available as well. The recommended solution is the API Gateway Developer Portal. It is a complete solution in that it allows anyone to sign up for an account, get an auto-generated API key instantly, subscribe to APIs, try out the APIs & even integrate with them in their apps.
Just like the solution we’ll build in this article, the API Gateway Developer Portal is also an AWS SAM app & can be deployed from the AWS Serverless App Repo. It has an elaborate architecture & uses a number of AWS services including Cognito & DynamoDB to store user information.
If all this sounds great to you, go for it! But if you’re like us & looking for a lightweight solution to deliver API docs, Swagger UI is much better. Since the Swagger UI is just a bunch of HTML, CSS & JavaScript files, you can even deploy it as a static website with no backend required in S3, Amplify, or outside AWS.
Now that we have explored a bit of Swagger’s history & alternative solutions to the API documentation challenge, let’s look at how we built our solution.
Solution Architecture
The design of our solution is rather minimalistic! All you get is an API in API Gateway & a single Node.js Lambda function & that’s it. The Lambda function packages the Swagger UI distributable & serves it on request. The API simply exposes a URL where the Swagger UI can be accessed.
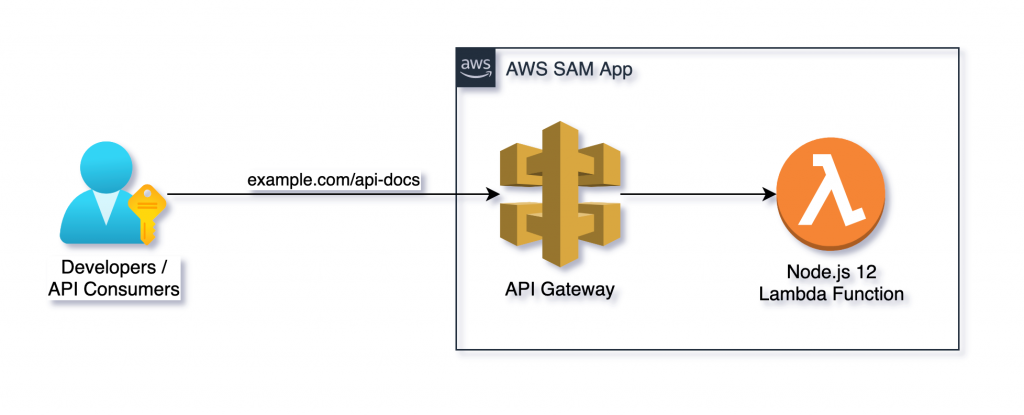
Let us now look at how we implemented the individual components of this architecture starting with the Lambda function.
The Lambda Function
The Lambda function packages the HTML, CSS & JavaScript files that make up the Swagger UI. These are served to the API callers by an Express.js server. The NPM package swagger-ui-express packages the Swagger UI distributable files & another NPM package serverless-http makes it possible to run an Express.js server inside a Lambda function.
Thanks to these awesome NPM libraries, our Lambda implementation is just 15 lines of code:
const express = require('express')
const serverless = require('serverless-http')
const swaggerUI = require('swagger-ui-express')

var options = {
    swaggerOptions: {
        url: process.env.SWAGGER_SPEC_URL
    }
}

const app = express()
app.use('/api-docs', swaggerUI.serve,
    swaggerUI.setup(null, options))

module.exports.handler = serverless(app)
As you can see above, the URL to the Swagger specification is picked up from a Lambda environment variable, which in turn is set by a SAM template parameter provided by the user when they deployed this app from the AWS Serverless App Repo.
The API Gateway
The API in API Gateway exposes just 2 endpoints:
- GET /api-docs
- GET /api-docs/{proxy+}
Both of these point to the same Lambda function (described earlier). GET /api-docs returns the Swagger UI’s index.html. This index.html in turn, loads supporting CSS & JavaScript files like swagger-ui.css, swagger-ui-init.js & swagger-ui-bundle.js. All these are served by the GET /api-docs/{proxy+} endpoint. The {proxy+} matches every sub-URL of /api-docs.
The SAM Template
The Lambda function & its API are packaged into an AWS SAM app by a SAM template:
AWSTemplateFormatVersion: 2010-09-09
Transform: AWS::Serverless-2016-10-31
Description: A Swagger UI for AWS API Gateway.

Parameters:
  SwaggerSpecURL:
    Type: String
    Default: https://petstore.swagger.io/v2/swagger.json
    Description: Enter a publicly accessible URL to the Swagger spec JSON/YAML.

Resources:
  SwaggerUiFunction:
    Type: AWS::Serverless::Function
    Properties:
      Description: The Lambda function that serves the Swagger UI.
      CodeUri: swagger-ui/
      Handler: app.handler
      Runtime: nodejs12.x
      Environment:
        Variables:
          SWAGGER_SPEC_URL: !Ref SwaggerSpecURL
      Events:
        SwaggerUiApi:
          Type: Api
          Properties:
            Path: /api-docs
            Method: GET
        SwaggerUiApiProxy:
          Type: Api
          Properties:
            Path: /api-docs/{proxy+}
            Method: GET

Outputs:
  SwaggerUiUrl:
    Description: Swagger UI URL
    Value: !Sub https://${ServerlessRestApi}.execute-api.${AWS::Region}.amazonaws.com/Prod/api-docs/
Deploying from SAR
You can deploy this pre-built solution from the AWS Serverless App Repo here. Provide the URL to your Swagger spec as a parameter to the deployment. The deployment creates a CloudFormation stack. You can find a link to your Swagger UI in the outputs of this stack. This URL is of the form https://YOUR-API-ID.execute-api.YOUR-REGION.amazonaws.com/Prod/api-docs/.
To have your API docs available at something like https://YOUR-DOMAIN/api-docs/, set up a custom domain mapping in the API Gateway console. Start by visiting console.aws.amazon.com/apigateway/main/publish/domain-names. Either create or select your custom domain here & configure an API mapping for it as shown below:
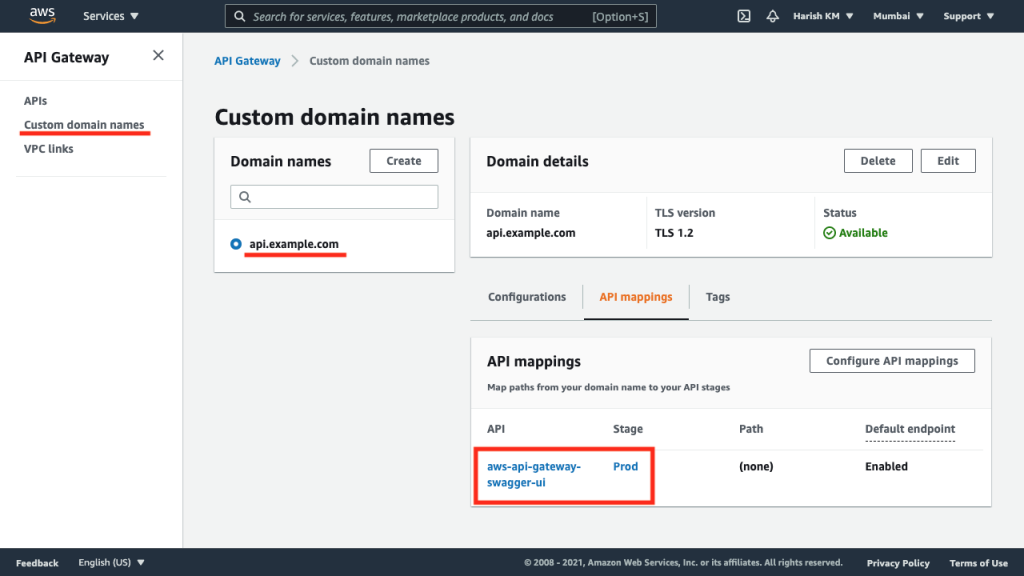
You can now see your Swagger UI at https://api.example.com/api-docs.
About the Author

Harish KM is an AWS Developer at QloudX. He is passionate about creating zero-maintenance fully-serverless cloud-native solutions in AWS. With 20+ cloud & IT certifications, he is an expert in a multitude of technologies, especially serverless.
Thanks, this was exactly I was looking for. By the way, is there any way I can use a Path in the Custom Domain Name?
For example, https://api.example.com/swagger/api-docs, where “swagger” is the path I would like to use to separate it from other existing elements in the same API Gateway.